Showing posts with label recipe. Show all posts
Friday, March 13, 2015
Buttermilk Chess Pie for Pi Day
As I have said before, Pi Day has become a special holiday for me. I also much prefer pie over cake, which most people don't agree with. (And yes, that is a Pi dish in the picture above.)
Last year, I became enamored with the idea of making a chess pie. I don't know why - I had literally never tried a chess pie in my life and couldn't even describe one to you. But somehow, I got this idea in my head, and it just wouldn't let up. I read recipe after recipe, and they all varied by little bits (I even drew an elaborate chart to see how many tablespoons of this and how many cups of that went into each recipe I found). The recipe below is what I pulled together from my research. (I have no idea if this is indicative of traditional chess pie, but I really like how it turned out.)
A note about crust: I don't make my own crust anymore since going gluten-free. I'm still wobbly on gluten-free baking, and I haven't yet attempted pie crust. I have, however, found a gluten-free crust that I LOVE that's premade. It's the Whole Foods brand, found in their freezer section, and it comes two per package. I've used them for both sweet and savory pies and found them to be very tasty. Just take a look in the package before you buy them - sometimes the edges are a bit broken up. (And the pie in the photo above is not actually a Whole Foods crust - they look a little better than that.)
Buttermilk Chess Pie
1 unbaked 9-inch pie crust
1 1/2 cups sugar
2 Tbsp cornmeal
5 eggs
2/3 cup buttermilk
1 stick butter (1/2 cup), melted
1 tsp vanilla
Preheat oven to 350°. Place pie crust on a baking sheet. Mix together sugar, cornmeal, eggs, and buttermilk until blended. Mix in melted butter and vanilla. Pour mixture into prepared pie crust. Bake for about 45 minutes or until the center is set. Cool before serving.
Tuesday, November 11, 2014
Kale and Brussels Sprouts Salad
The thing about the online food world is that the seasons are marked by recipes. The current recipe perfect for fall that's on just about every site there is? Kale and Brussels Sprout Salad.
I have seen versions of this recipe in my email, on twitter, on gorgeous pictures on Pinterest for days and days. The more I saw, the more I wanted to eat it myself.
I guess I'm pretty susceptible to advertising, then.
Chopping everything takes some time, and I definitely hit a point when I thought that all that chopping couldn't be worth it. (I also realized that I had been cutting the brussels sprouts poorly. The best way is to cut in half through the stem, then slice thinly horizontally from the top, working your way down towards the stem. Once I figured this out, things went much smoother.)
All that chopping is most certainly well worth it. I realized about halfway through dinner that I should have made a double or even triple recipe, because this salad was pretty much all I wanted to eat. A day later, I'm still thinking about how much I want to eat this.
Good thing I have more brussels sprouts and kale in the fridge.
Kale and Brussels Sprouts Salad
1 Tbsp dijon mustard
2 Tbsp lemon juice
1/4 cup olive oil
1 pound brussels sprouts, sliced very finely so the layers flake apart
1 large bunch of kale, ribs removed, sliced thinly
4-5 slices of bacon, cooked and crumbled
handful of hazelnuts, roughly chopped
pecorino romano
Whisk together the dijon mustard, lemon juice, and olive oil. Add salt to taste (a pinch will probably do).
In a large bowl, combine cut brussels sprouts and kale. Toss with dressing - make sure it gets all the leaves covered. Let sit 15-20 minutes before finishing. If the salad is still a little dry, add another splash of olive oil and toss. The dressing will wilt the leaves a little and make them softer.
Before serving, add crumbled bacon, hazelnuts, and shavings of pecorino cheese. Toss and enjoy.
Labels:
bacon,
brussels sprouts,
gluten-free,
kale,
nuts,
recipe,
salad,
vegetables
Sunday, November 3, 2013
The Only Caramel Snack Mix You'll Ever Need
For the past few years, I've been throwing together some kind of snack mix for my friends' annual Halloween party. My thinking is that it's always good to have something to snack on before the drinking begins. I've tried a variety of different mixes and coatings, but I think I've finally tried the last recipe I'll ever need. Is there proof for this? Well, the bowl was completely empty by the end of the night (which has never happened before), so I'm pretty sure this one's a keeper.
As with most snack mixes, feel free to play with the ingredients. This year I opted for popcorn, corn Chex, Fritos, and (after the baking) M&Ms. You could easily add nuts (pre-baking), other cereals (pre-baking), dried fruit (pre- or post-baking), tortilla or potato chips (pre-baking), pretzels (pre-baking), or any other kind of candy (post-baking). You can also vary the amount you add - I like all my ingredients to get some of the caramel, but not to be drenched, but if you prefer a more uniform covering of caramel, use 2-4 cups less of ingredients.
The Only Caramel Snack Mix You'll Ever Need
12 cups salted popcorn
6 cups rice or corn Chex
3 cups Fritos
1 cup (2 sticks) butter
1 1/2 cups brown sugar
1/2 cup light corn syrup
1 tsp salt
1/2 tsp vanilla
1 tsp baking soda
1 cup M&Ms
Preheat oven to 250°. Combine popcorn, Chex, and Fritos (or whatever other ingredients you are using that will not melt) in one or two roasting pans.
In a medium saucepan, combine the butter, brown sugar, corn syrup, and salt. Stir occasionally until the mixture comes to a boil. Boil for 5 minutes, stirring occasionally. Keep the temperature as low as possible, as the caramel can burn easily. Once it starts to boil, this may be a very low temperature - you just want to keep it at that state.
After 5 minutes of boiling, remove the caramel from the heat. Stir in the vanilla, then stir in the baking soda. This will cause the caramel to expand.
Pour the caramel over the popcorn mix, and toss the mix to make sure the caramel gets on everything.
Bake for about 20 minutes, stirring everything and scraping up the extra caramel halfway through.
Remove from pan(s) into a large bowl to cool. You may need to break apart some of the pieces as they cool. Once the mix is not warm to the touch, add in any candies and toss to distribute.
If there's any left after you serve it (and there won't be), store it in an air-tight container.
Sunday, September 15, 2013
Dip and Sip Challenge, featuring BLT Guacamole
I could eat avocado every day. Every. Day. Of course, I don't, because they're always rock hard when I buy them, and then they all get ripe and soft at the exact same time ten days later.
I don't often declare my love of avocados out loud, so I was a bit surprised when I was invited to create a recipe for the Dip and Sip Challenge, sponsored by Piedra Azul Tequila, to celebrate National Guacamole Day (September 16th). I happily joined 9 other bloggers on the task, and I got to work.
Piedra Azul sent me a wonderful bottle of their blanco tequila, as well as a copy of Gaby Dalkin's new cookbook, Absolutely Avocados, for inspiration. I pored over the book, wanting to lick the pages, and marveling over some of the uses of avocado (hello, avocado-coconut ice cream!). Gaby includes tons of tips and tricks for buying and using avocados, including a whole section on different varieties of avocados that us poor folks in the northeast will NEVER see.
My friends and I eat guacamole at pretty much every gathering, to the point where even the folks who don't really cook know what the steps are and how to chop everything just right. For National Guacamole Day, however, I wanted something a little more unusual, and once I got the idea for BLT guacamole in my head, I just couldn't shake it.
The tomato part was easy; I always add tomato to my guacamole. Not much different there. Bacon - well, bacon can be added to anything. Definitely not a challenge. But lettuce? When I get guacamole at a Mexican restaurant, it always comes on a sad pile of shredded lettuce that I do my best to avoid. Even leafy, bright lettuce turns watery when chopped and mixed too much. And then, the answer came in the shape of my CSA share - kale!
Kale, pureed with some jalapeno, turned into the perfect lettuce-substitute. It gave the guacamole enough leafy green taste without changing the texture, (and hey, I hid half a bunch of kale in plain sight!). I added a little more kale, sliced into tiny threads, along with more tomato and bacon for garnish. I put the whole shebang into my molcajete (ok, it's a marble mortar) to serve.
BLT Guacamole
3-4 ripe Haas avocados, halved and pits removed
juice of 1 lime
1/2 to 1 jalapeno, seeds and ribs removed (if you want less kick)
6 large leaves of kale, ribs removed, 1 leaf reserved
1 large tomato, or about 12-15 cherry tomatoes, seeds removed
3 slices of bacon, cooked and crumbled
salt and pepper
In a large bowl, mash avocado together with lime juice. Just break up the chunks; as you stir in the other ingredients, the avocado will become creamier.
In a food processor, mince the jalapeno (decide how spicy you'd like your finished product) and 5 kale leaves together. It won't quite puree, but you want it as smooth as possible. Add to the avocado and stir to combine.
Finely chop the tomato, reserving a tablespoon or so for garnish. Mix the rest into the avocado.
Add most of the crumbled bacon and combine. Salt and pepper to taste.
To serve, top the guacamole with finely julienned kale, chopped tomato, and a sprinkle of bacon.
And what goes better with guacamole than a margarita? (If you said tortilla chips, you can just shut up. You've clearly never eaten guacamole with a spoon.) I didn't love margaritas for a long time because I always thought of them as syrupy sweet and bright green. But when I realized they were easy to make at home, I was a much happier camper. A traditional margarita is usually 3 parts tequila, 2 parts orange liqueur, and 1 part lime (sometimes 2 parts lime, 1 part orange liqueur instead). I occasionally find that even a little too sweet, wanting just to savor the acidic bite of the citrus alongside the tequila. Combining multiple kinds of citrus adds more sweetness without getting too cloying. And while mixing all those juices together doesn't produce the prettiest drink, it does provide a mixer that doesn't overshadow the tequila, so you want to use a better tequila, like Piedra Azul.
Mixed Citrus Margaritas
This isn't so much a recipe as a set of guidelines.
Combine the juice of whatever citrus you'd like - I like one grapefruit, 1 tangerine (or blood orange, when in season), 1 lemon, and 2 or 3 limes. This much citrus makes enough juice for 6-8 drinks.
Combine 1/4 cup tequila with 1/4 cup of citrus juice. Serve over ice, with or without a salted rim on the glass.
Wednesday, July 31, 2013
New England Summer in a Bowl
There is nothing more evocative of a New England summer than corn, tomatoes, and lobster. A summer is not complete without a meal containing all three (luckily, I have never had a summer go by without a meal like that).
However, I'm not a huge fan of eating a whole lobster as a meal. It's too messy, and the tail gets cold while I'm working on the claws (or vice versa), and what do you do with the plateful of water that comes pouring out of the body?! Add to that a trip to the sink to rinse the gunk out of the tail meat, and you don't have the most pleasant of meals.
This recipe came about precisely because of this. It's the best way to combine those summer flavors into one dish. It's so simple, in fact, that this is really an un-recipe. I've spread it around to friends and family, and each person makes it their own. So consider this less of something to follow and more of a jumping-off point.
This recipe naturally doubles or triples very easily, and it's a wonderful dish to serve a party (plus, you're serving lobster! But you only have to buy 4 or so to feed a crowd!).
Lobster, Corn, and Tomato Hash
2 Tbsp butter
3-4 ears of corn, kernels cut from the cob
1/2 pint cherry tomatoes, the smaller the better (you can use big tomatoes too, like I did above, but the result is a little more watery)
2 1-lb(ish) lobsters, cleaned, and meat roughly chopped
Handful of basil, torn into small pieces
Salt and pepper
Melt the butter in a large skillet. Add corn and tomatoes and cook, stirring occasionally, until the tomatoes begin to burst. Add lobster and basil and cook until lobster is warmed through. Salt and pepper to taste.
Monday, July 1, 2013
A Donut Hole Croquembouche
I have been enamored by the idea of the Croquembouche for a while - a tower of cream puffs under a net of spun caramel threads. I've wanted to make one, especially after I mostly mastered caramel a year or so ago. But what situation called for a cream puff tower? It seemed a little extreme for most of the occasions in my life.
However, when my friend Ann told me that she was hosting the wedding shower for our friend April and mentioned the idea of a Croquembouche, I jumped at the chance to make one. April is a huge Dunkin' Donuts fan, but she lives in LA, where there are no DD franchises. When she visits Boston, the are always multiple boxes of donut holes around. By simply replacing the cream puffs in a Croquembouche with donut holes, we'd have an impressive-looking dessert that the bride would adore.
I was surprised at just how easy this was to make! Granted, I had taken out a lot of the work by buying donut holes rather than making my own cream puffs, but even the structure was not that difficult to put together. Plus, playing with the sugar to get the netting around the tower was just plain fun.
Note: I used a cardboard cake round as the base, like something you would get from a bakery. Since you're basically gluing down the donuts with caramel, I would suggest using one of these, since cleaning a real plate later will be a total bear.
Donut Hole Croquembouche
2 cups sugar
1/2 cup water
Large box of donut holes (about 50) - plain or glazed flavors work better than powdered flavors
In a medium saucepan, heat sugar and water over medium-high heat. Do not stir! Swirl the pan gently if you feel you must stir. The sugar will dissolve, melt, and begin to turn golden. Reduce heat as it begins to turn color. Watch the caramel carefully as it darkens - too dark and it will taste very burnt. Don't forget it will continue to cook a bit after you take it off the heat!
Working one by one, dip one side of a donut hole in the caramel, then place it caramel-side down on the serving plate. Continue this, placing them in a circle around the plate. Begin stacking them into a tower, caramel-side down. If the donut holes are strangely shaped and won't stay on their own, spoon some caramel into any gaps and hold them down as the caramel hardens.
Once all the donut holes have been placed, dip a spoon into the caramel (which will have cooled a good deal by now). As you lift the spoon out of the pan, a thin strand of caramel will harden - you can actually tug on the string to make it longer and thinner. Gently work these strands around the tower as you pull them off the spoon. They will harden quickly, so place them quickly, but you'll have plenty of caramel, so don't worry about it if you don't get a strand in place before it hardens. Continue until you have a sparkly net over the whole tower.
Monday, April 15, 2013
Olive (yes, olive) Shortbread
I like a little challenge. That is exactly why I love Kitchen Play - the site often challenges me to think creatively about a particular ingredient. So when Kitchen Play hosted a progressive party (with different bloggers taking on each course) for Lindsay Olives, I wanted to join in. Five bloggers posted delicious recipes, and readers were invited to add their own course.
Now, the post was worded in such a way that immediately made me want to try making a dessert. But what to make? There are plenty of olive oil desserts out there, but not many that use actual olives.
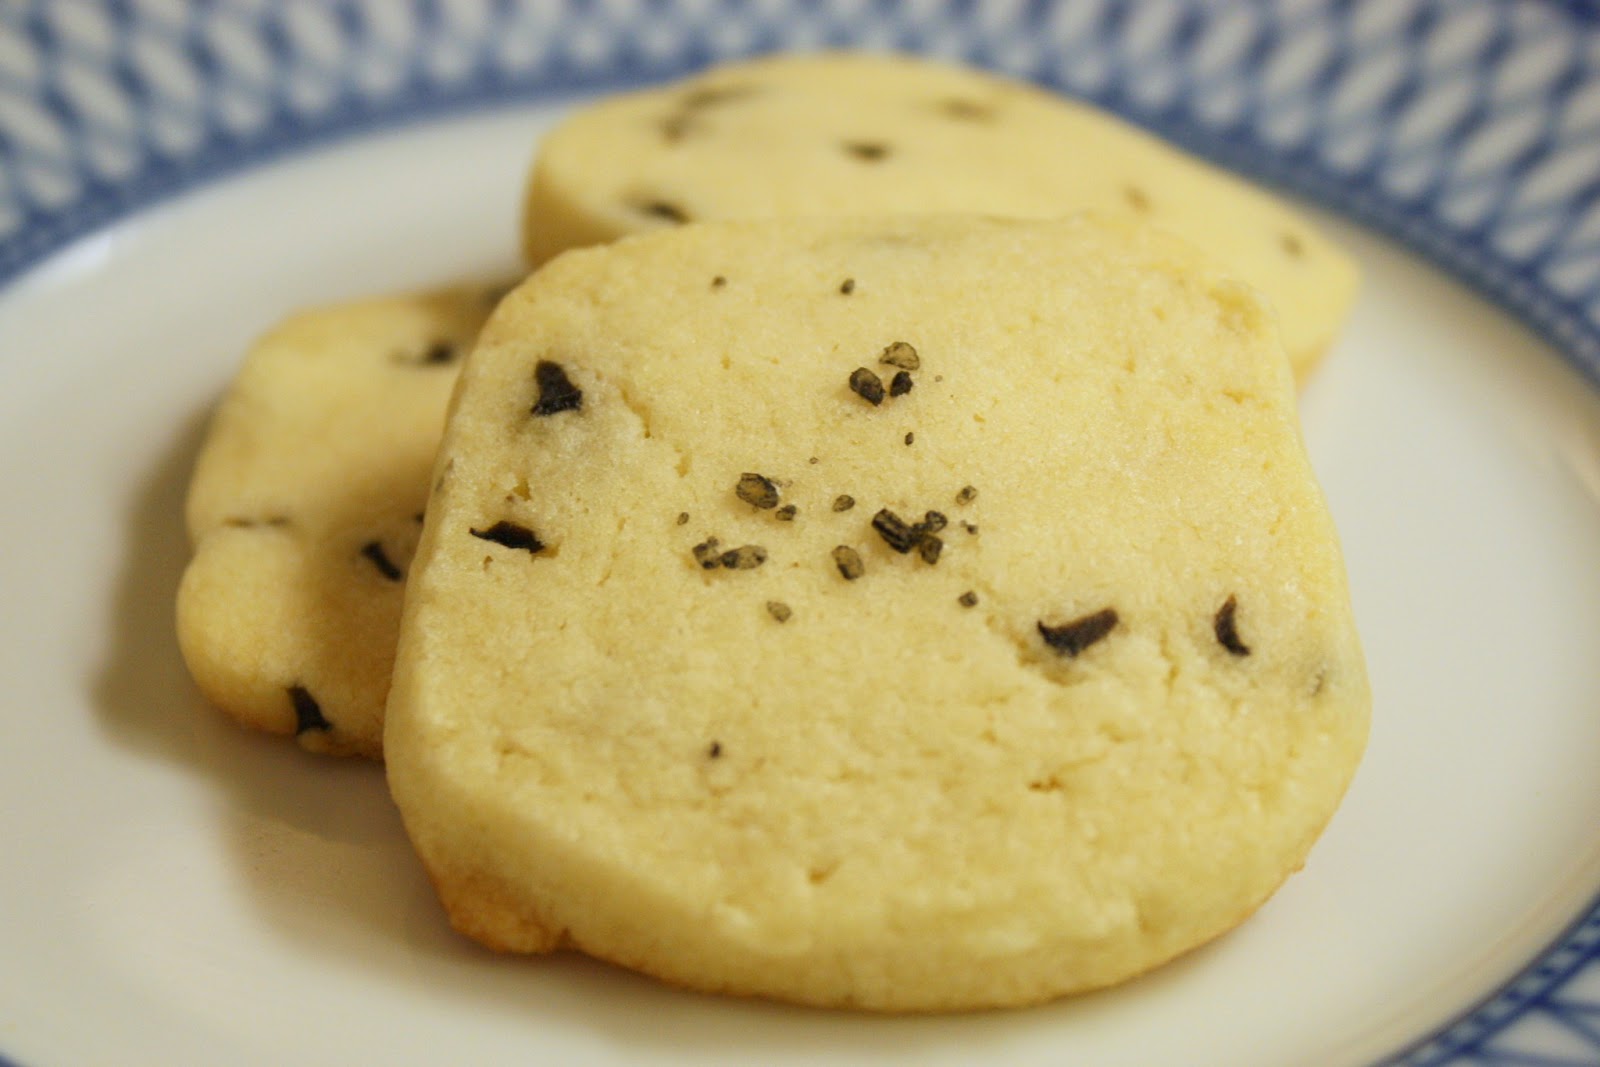
Since cookies are probably my favorite thing to bake, I went for that. Shortbread, which doesn't have a lot of flavors already competing with the addition of olives, seemed perfect. I wanted to enhance the flavor of the black olives, so I subbed out a little of the butter in my normal shortbread recipe for olive oil.
The resulting cookie is floral and citrus-y and just a little bit unctuous. I had a very nice lemon olive oil sitting around from my trip to Italy last fall, but you could certainly use a plain olive oil instead. The chopped olives gave a nice amount of chew to the crispy cookie, plus they gave a little bit of a burst of olive-y goodness every once in a while. I sprinkled black sea salt on the tops of some of the cookies, and I enjoyed those even more (but then I'm a sucker for salt in my sweets).
Will I be making olive shortbread again? Oh yes!
Olive Shortbread
1 1/2 sticks (12 Tbsp) butter
1/4 cup good olive oil (lemon olive oil, preferably)
3/4 cup sugar
1 large egg
pinch of salt
2 1/2 cups flour
12 Lindsay large pitted black olives, washed and minced
black sea salt (optional)
Cream butter and sugar together until pale and fluffy. Cream in olive oil. Mix in egg and salt. Add in flour and mix until just combined. Gently mix in the minced olive so it doesn't get mushed. Halve dough and shape each half into a squared log about 1 1/2 inches in diameter. Wrap in parchment paper and freeze until firm, at least one hour.
Preheat oven to 375°. Cut dough into 1/4 inch thick slices. Place slices on parchment-lined cookie sheet and sprinkle with sea salt. Bake until edges are golden, about 15 minutes. Do not let the cookies brown, just look for hints of color at the edges.
Sunday, April 14, 2013
Green Goddess Lamb Kebabs
I had such a blast cooking in the inaugural Lamb Pro-Am last year, I jumped at the chance to participate again. Last year's recipe was so personal for me, and I was very proud that I got to the finals with that dish.
Because American lamb has such a wonderful taste (never that game-y flavor that most people associate with lamb), I didn't want to make anything that would cover up the actual lamb flavor. A mix of herbs, I thought, would compliment that taste without overpowering it while also making the dish feel very Spring-y.
But the herbs needed a vehicle. I started looking at Green Goddess dressing recipes, but I avoid most things that call for large amounts of mayonnaise. That got me thinking, however, about how I often swap mayo out of recipes for Greek yogurt, something I still don't eat on its own but which certainly still has its place in the kitchen. Using yogurt as a marinade base also has the wonderful effect of tenderizing the meat; the boneless leg of lamb I had was almost flawless, but a yogurt marinade can help a more grizzly chunk of meat soften up. I call these Green Goddess Lamb Kebabs, but I know this isn't a traditional Green Goddess dressing. Maybe Green Goddess-ish Kebabs would be a better name?
I served these kebabs with shaved parsnip chips and leftover marinade. The sweetness of the parsnips was a nice contrast to the creamy dip, plus the chips added some great texture.
A note on the herbs: I used a mix of parsley, cilantro, basil, dill, and mint. You can leave out any of these that you might like. For one container of yogurt, I filled an entire salad spinner with herb leaves (picked off their stems). This probably added up to about 2 grocery store-sized bunches of herbs. Use as much as you like, but this is definitely a case where the more, the merrier!
And thanks again to the wonderful American Lamb Board and Boston Chefs for sponsoring this event. They both go to great lengths to support American lamb, which I find the tastiest of all the lamb out there.
Voting is open now, and you can buy tickets to the Lamb Pro-Am Finals by heading here.
In a large mixing bowl, combine yogurt, garlic, minced herbs, scallions, and lemon juice. Stir to combine, then blend with an immersion blender. Salt and cayenne pepper to taste. Remove half of the sauce and reserve. Add lamb to remaining sauce in bowl, making sure all the lamb is well covered by the sauce. Refrigerate 24 hours.
Heat grill. Thread lamb onto wooden skewers, being careful not to pack them in too closely or they won't cook evenly. You do not have to wipe off any marinade that is clinging to the meat. Grill about 5 minutes per side, until they are pink in the middle. Serve with reserved sauce.
Because American lamb has such a wonderful taste (never that game-y flavor that most people associate with lamb), I didn't want to make anything that would cover up the actual lamb flavor. A mix of herbs, I thought, would compliment that taste without overpowering it while also making the dish feel very Spring-y.
But the herbs needed a vehicle. I started looking at Green Goddess dressing recipes, but I avoid most things that call for large amounts of mayonnaise. That got me thinking, however, about how I often swap mayo out of recipes for Greek yogurt, something I still don't eat on its own but which certainly still has its place in the kitchen. Using yogurt as a marinade base also has the wonderful effect of tenderizing the meat; the boneless leg of lamb I had was almost flawless, but a yogurt marinade can help a more grizzly chunk of meat soften up. I call these Green Goddess Lamb Kebabs, but I know this isn't a traditional Green Goddess dressing. Maybe Green Goddess-ish Kebabs would be a better name?
I served these kebabs with shaved parsnip chips and leftover marinade. The sweetness of the parsnips was a nice contrast to the creamy dip, plus the chips added some great texture.
A note on the herbs: I used a mix of parsley, cilantro, basil, dill, and mint. You can leave out any of these that you might like. For one container of yogurt, I filled an entire salad spinner with herb leaves (picked off their stems). This probably added up to about 2 grocery store-sized bunches of herbs. Use as much as you like, but this is definitely a case where the more, the merrier!
And thanks again to the wonderful American Lamb Board and Boston Chefs for sponsoring this event. They both go to great lengths to support American lamb, which I find the tastiest of all the lamb out there.
Voting is open now, and you can buy tickets to the Lamb Pro-Am Finals by heading here.
Here's my lamb grilling on our indoor electric grill because it rained the day I made this recipe.
Green Goddess Lamb Kebabs
16 oz. Greek yogurt (not fat-free)
2-3 garlic cloves, crushed
about 2 bunches worth of fresh herbs (parsley, cilantro, basil, dill, mint), minced
4 scallions, minced
juice of 1 lemon
salt
cayenne pepper
2-3 lbs lamb, cut into 1 to 1 1/2 inch cubes
Heat grill. Thread lamb onto wooden skewers, being careful not to pack them in too closely or they won't cook evenly. You do not have to wipe off any marinade that is clinging to the meat. Grill about 5 minutes per side, until they are pink in the middle. Serve with reserved sauce.
Tuesday, February 12, 2013
Valentine's Day Veggie Soup
Over the weekend, trapped in the house due to the blizzard, I figured soup would be a perfect way to stay cozy. I had seen this nifty heart-shaped carrot tutorial and knew I had to incorporate it. Once you get a hang of cutting the carrots, it really doesn't take too long to make. For long carrots, I'd recommend cutting them in half first so they're shorter and more manageable.
Since I also had butternut squash to add to the soup and I knew it would remain pretty solid throughout the cooking, I wanted to make them heart-shaped as well. The technique for these is a little different - cut fat slices of the top (skinnier) section. Cut each of these slices into 6 triangles, like you're cutting a pie. Make a notch in the top of each triangle and use your potato peeler to round edges into a heart shape. Slice into thin pieces like with the carrot.
This soup - whether you make heart-shaped carrots and squash or not - is hearty and filling and delicious! We all went back for seconds and even enjoyed it again the next day!
Heart-y Veggie Soup
2 Tbsp olive oil
3 slices of bacon, diced
1 yellow onion, diced
3 carrots, cut into heart-shaped slices (or diced)
3 celery stalks, diced
about 1/2 lb butternut squash, cut into heart-shaped slices (or diced)
28-oz can peeled tomatoes, roughly chopped, including juice
4 cups chicken broth
2 cups water
1 bay leaf
1 can cannellini (white) beans
3-4 large leaves of kale, chopped and stems removed
In a large pot, heat olive oil, then add bacon and cook until it begins to brown. Add onion, carrots, celery, and squash and cook over medium heat, stirring occasionally, until the veggies start to soften, about 10 minutes.
Add tomatoes and juice, broth, water, and bay leaf. Bring to a boil, then simmer uncovered until the veggies are tender, about 30 minutes. Remove bay leaf, then stir in beans and kale. Serve once beans are heated through and kale is wilted. Season with salt and pepper to taste.
Sunday, February 10, 2013
Lamb Kufte is for Lovers
According to the American Lamb Board, February is Lamb Lover's Month. When they reached out to me to create a special Valentine's Day meal for two, there was no way I could say no.
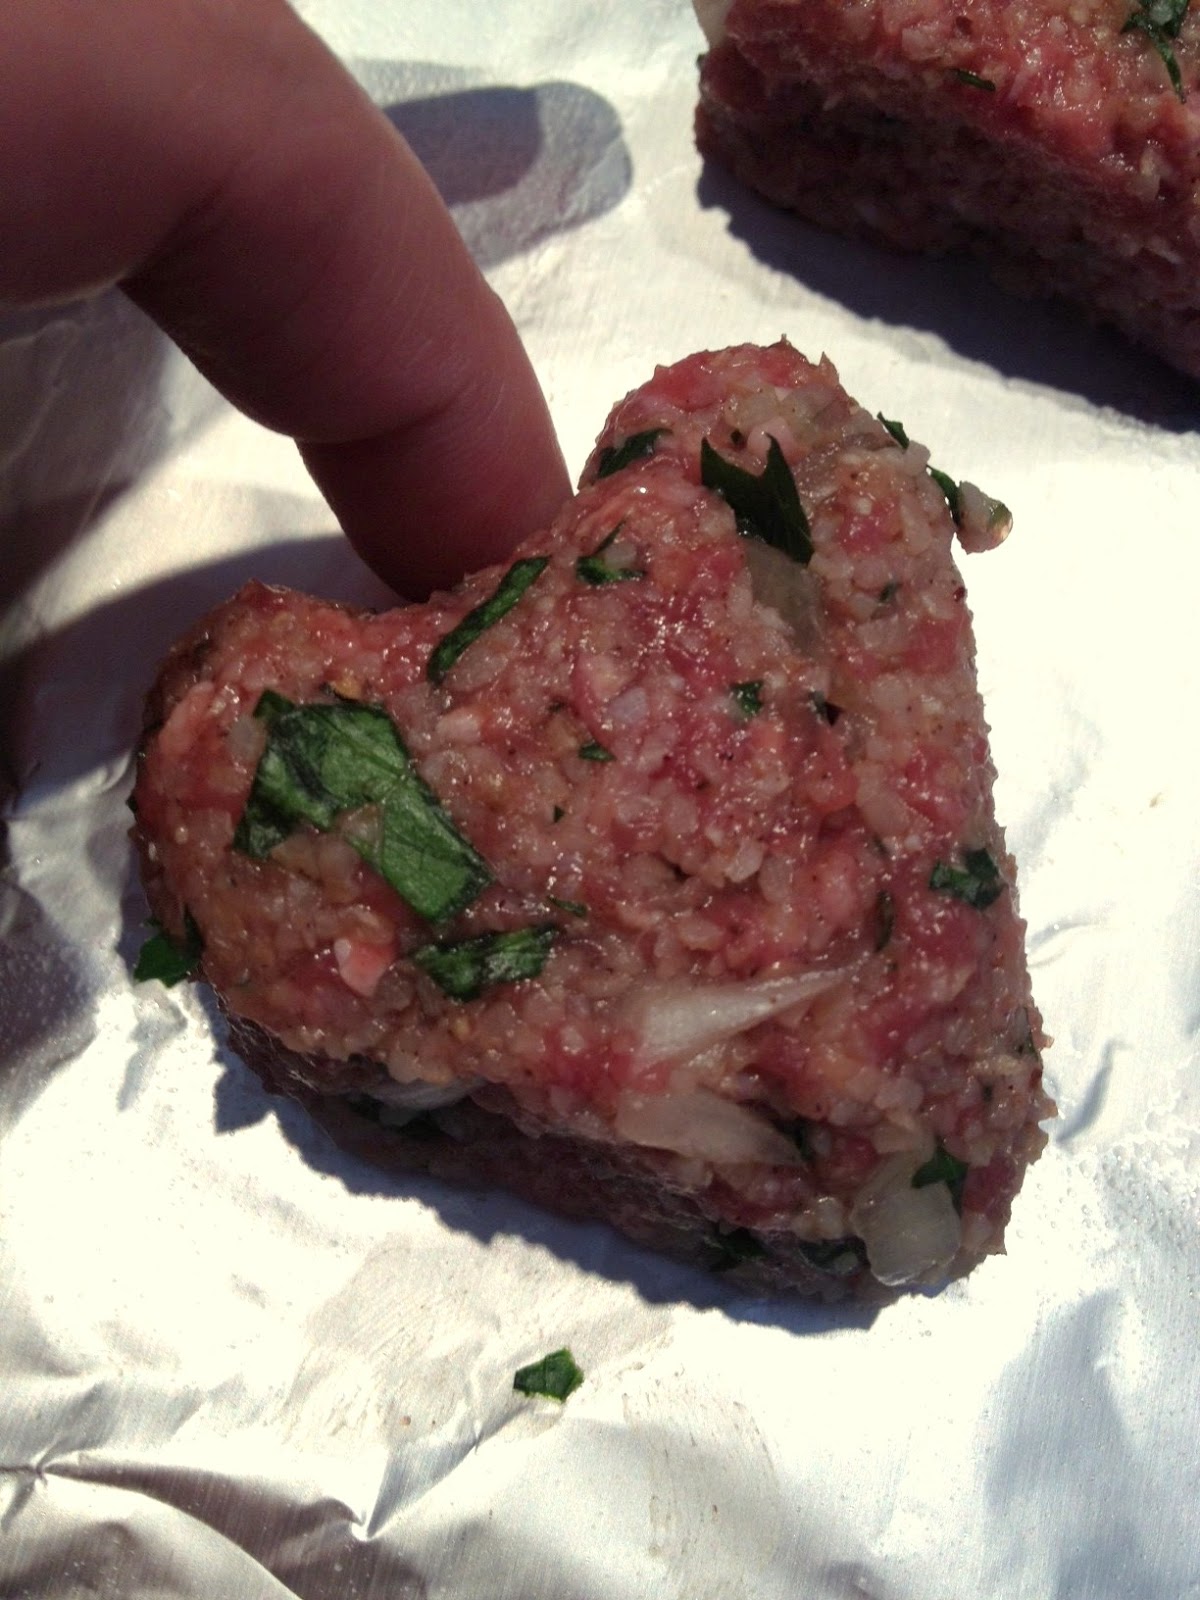
I'm a fan of the typical cheesy Valentine's Day stuff - heart-shaped everything, splashed in red and pink, surrounded by little baby cupids. My Valentine's Pinterest board has more links than my Christmas boards! So forgive me if I went a little overboard with this recipe of heart-shaped kufte. If your heart (ok, that was taking it a bit too far) isn't in it, you could just shape these as patties or meatballs.
I was so happy with this recipe, I would have made a second batch right away to put into the freezer just to have on hand... if we hadn't been in the middle of a huge blizzard here in New England. As it is, I will be making this again in the future. It was relatively quick to make (especially if you make the sauce ahead of time or start it first), and it stretched one pound of meat into enough to fill 4 people. Another plus? It can be made ahead of time, just doing the final bake before you eat - especially helpful when Valentine's Day falls on a weekday ;)
And the sauce! Oh god, the sauce! I wanted to use pomegranate molasses, but I thought the flavors would be even more exciting if I made my own and added some red wine. I could probably eat the sauce all by itself, because it tastes like a very tart and tannic jam. I'd love to try it on other meats as well.
I served my kufte with buttery pilaf topped with fresh pomegranate seeds, although a salad or even some noodles would work.
Heart-Shaped Lamb Kufte with Pomegranate Wine Molasses
1/2 cup bulgur wheat
1/2 cup hot water
1 small onion, minced
1 shallot, minced
large handful of fresh parsley, minced
1 egg
1 tsp salt
1/4 tsp pepper
1/2 tsp allspice
1/4 tsp cayenne pepper
1/4 tsp sumac
1 lb ground lamb
In a mixing bowl combine bulgur wheat and hot water; let sit, covered, for 15 minutes. If there is any water left after 15 minutes, carefully pour it out. Add onion, shallot, parsley, egg, salt, pepper, allspice, cayenne, and sumac, and mix well. Add lamb and incorporate with the rest of the ingredients. Don't overwork the lamb or it will become tough.
Line a baking sheet with foil. To shape hearts, take a golf ball-size piece of mixture and form it into a triangular patty. Place on baking sheet, then gently use one finger to form an indentation in the top of the triangle (as in the picture above) to form the heart (this may take a bit of coaxing). Refrigerate for 30 minutes.
Cook kufte in a 350° oven for 15 minutes, flipping halfway through. Serve with pomegranate wine molasses below.
Pomegranate Wine Molasses
2 cups pomegranate juice
2 cups red wine
1 shallot, minced
2 tsp honey
salt
In a medium saucepan, combine juice, wine, and shallot. Bring to a boil and cook about 45 minutes, until reduced to 1/2-cup or so. Whisk occasionally to make sure nothing is sticking. In the last 5 minutes, add the honey and whisk well. Once the sauce is reduced, add salt to taste and serve with kufte.
Tuesday, January 29, 2013
Blood Orange Negroni
The Negroni has been my drink for a while now. I like the play between bitter and sweet that it offers, plus I don't know anyone else who likes it, so I don't have to worry about running out of ingredients.
Traditionally, a Negroni is one part gin, one part sweet red vermouth, and one part Campari, served with an orange peel garnish. I tend to think of Campari as a summer drink (probably because I was first introduced to it on a hot summer day in the form of a Campari and soda). The addition here of blood orange to the basic recipe makes the drink slightly sweeter and also makes it something special that can only be made in the winter months, when blood oranges are available.
Blood Orange Negroni
1 part gin (I use Bombay Sapphire)
1 part Campari
1 part fresh-squeezed blood orange juice
1/2 part red vermouth
slice of blood orange
In a short tumbler, pour gin, Campari, juice, and vermouth over a handful of ice. Stir well, then top with orange slice.
Tuesday, January 8, 2013
Finally, Fantastic Crab Cakes!
For a simple but elegant New Year's Eve dinner, I made the crab cakes and placed them on top of a salad made of butter lettuce, avocado, and grapefruit. I made a simple dressing with olive oil and grapefruit juice to tie everything together. I paired the salad with popovers, and we were all very happy.
These crab cakes are a breeze to whip up, and they can be made a few hours ahead of time and kept in the fridge before baking. Oh, and did I mention they're baked, not fried? These would be an elegant appetizer at a party, but I wouldn't hesitate to make them for a weeknight dinner, either.
Sesame Crab Cakes (from Real Simple Magazine)
8 ounces lumb crab meat
1/4 cup fresh bread crumbs *
2 scallions, thinly sliced (I used a handful of chives)
1 egg
1 Tbsp toasted sesame seeds
zest of 1 lime
3 Tbsp mayonnaise
3/4 tsp salt
Preheat oven to 450°. Line a baking sheet with foil and spray with baking spray (I used grill foil, which is already non-stick).
In a medium bowl, combine all the ingredients and mix well. Form into about 20 miniature patties and place on baking sheet. Bake until golden, about 3 to 4 minutes per side.
*Use fresh bread crumbs instead of packaged. They make a big different. Just bake a couple of slices of bread at 300° for a few minutes per side until crispy, then use a food processor to chop fine. Store any extra in the freezer for next time.
Monday, November 19, 2012
Cauliflower Not-Pizza
I saw this recipe floating around the interwebs over the summer, and I was automatically intrigued. Pizza crust made out of cauliflower and cheese?! Is that even possible?
Well, not entirely. Calling it pizza is a real stretch. Calling it a delicious cauliflower treat - sure, let's run with that instead.
I can see this being a perfect way to get kids (or *cough* reluctant adults) to eat their veggies. I personally love cauliflower, but I know lots of people who aren't big fans. Top it with enough cheese, though, and they're sure to at least try it. Add that much cheese and you start losing some of the health benefits, though, don't you?
Since I already enjoy cauliflower, I don't think I'll take the time to be making this again. I could just melt some cheese over regular cauliflower for a similar taste.
Cauliflower Not-Pizza (inspired by Mom, What's For Dinner?)
1 small head of cauliflower, steamed and riced
1 cup shredded low-moisture mozzarella cheese, divided
1 cup Parmesan cheese, divided
1 egg
1 tsp pasta sprinkle (or dried basil and oregano)
Preheat oven to 450°. Line a baking sheet with parchment paper.
In a large bowl, combine the riced cauliflower, 1/2 cup mozzarella, 1/2 cup Parmesan, egg, and dried herbs. Stir together until the mixture is uniform. Put the mixture onto the lined pan and gently press into a rectangle. Press as thinly as possible - this will help it crisp up.
Bake for 15-20 minutes, until it starts to brown. Remove from oven and gently invert onto another piece of parchment paper (so the bottom is now the top and can brown). Top with the remaining cheese and bake until cheese is melty and golden. Serve immediately.
This is my first entry for the Holiday Pin It and Do It Challenge, from this pin.
Labels:
cheese,
nablopomo,
Pin It Do It,
pizza,
recipe,
vegetables,
vegetarian
Sunday, November 11, 2012
Pizza Crisps
Today was one of those days when I don't eat enough early enough, and by the time I actually get around to eating, I'm so hungry that I'll eat whatever's in sight, good or bad. I argued with myself for pretty much the entire drive home from work about stopping for take-out. I managed to make it home without picking up something, but I was SO hungry by then that I couldn't even wait to make the recipe I had planned (cauliflower-crust pizza).
But pizza was on the brain. I had pinned a tasty-looking snack on Pinterest for pizza crisps, made with wonton wrappers, and there just happened to be a whole package of wonton wrappers sitting in my fridge. Hallelujah!
Think of these as pizza nachos. They're crispy and cheesy and just what I needed. You can add whatever toppings you like (I had a few with crumbled bacon, my favorite pizza topping), but I would avoid tomato sauce, which will just make the wontons soggy. Go for real tomato pieces if you want that flavor.
Pizza Crisps (from Wendy See Wendy Do)
6 wonton wrappers
1/2 cup grated mozzarella cheese
your favorite Italian seasoning mix
additional toppings (pepperoni, veggies, etc)
Preheat oven to 350°. Line a baking sheet with foil. Lay wonton wrappers on sheet and spray lightly with cooking spray. Top with cheese, a sprinkle of seasoning mix, and any other toppings you'd like. Bake for about 10 minutes, until edges are browned and cheese is melty.
Wednesday, March 14, 2012
Pi Day for Ron
Pi Day (or March 14th for the 3.14 in Pi) never meant much to me. In school, I had a number of math teachers who tried to make it fun, but math was never my favorite class.
My brother Ron, however, loved it. At his last job, he had instituted Pi Day festivities, sending out invites months ahead and rallying everyone to join in on a silly mid-week celebration. In fact, he loved anything quirky or odd or just plain stupid like Pi Day. That's just the kind of guy he was.
Ron passed away suddenly last year, and pretty much nothing has been right since. He was one of my best friends, and I think he was finally starting to see me as an adult and not his stupid kid sister. He was the one who was constantly finding things to share with me - YouTube videos, new TV shows, weird catchphrases - and this past year has been awkward trying to find and enjoy these things on my own. I've been left with a lot of sad memories, which I know he would have hated.
Pi Day, though. That's a thing he loved for no real reason other than it was quirky. It's something I can be damned sure I'm going to celebrate for the rest of my life because it made him happy. And if pie can't fix things, even just for a little while, then I don't know what else can.
Because I'd much rather remember Ron on a day like today, for reasons like pie.
Bacon Chocolate Cream Pie
1 1/2 cups crushed Oreos (about 15 cookies broken in a food processor)
3 Tbsp butter, melted
1 pint heavy cream
1 Tbsp powdered sugar
1 tsp vanilla paste
1 package chocolate pudding, prepared as directed
5 pieces candied bacon, chopped
Mix together crushed oreos and butter until all the crumbs are moist. Gently pat into the bottom and sides of a pie dish. Refrigerate until ready to use.
In a mixer, whip heavy cream, powdered sugar, and vanilla until soft peaks form. Don't overwhip the cream. Gently fold half the whipped cream into the pudding and pour into the prepared pie dish. Top with the remaining whipped cream and decorate with the chopped bacon. Chill before serving.
My brother Ron, however, loved it. At his last job, he had instituted Pi Day festivities, sending out invites months ahead and rallying everyone to join in on a silly mid-week celebration. In fact, he loved anything quirky or odd or just plain stupid like Pi Day. That's just the kind of guy he was.
Ron passed away suddenly last year, and pretty much nothing has been right since. He was one of my best friends, and I think he was finally starting to see me as an adult and not his stupid kid sister. He was the one who was constantly finding things to share with me - YouTube videos, new TV shows, weird catchphrases - and this past year has been awkward trying to find and enjoy these things on my own. I've been left with a lot of sad memories, which I know he would have hated.
Pi Day, though. That's a thing he loved for no real reason other than it was quirky. It's something I can be damned sure I'm going to celebrate for the rest of my life because it made him happy. And if pie can't fix things, even just for a little while, then I don't know what else can.
Because I'd much rather remember Ron on a day like today, for reasons like pie.
Bacon Chocolate Cream Pie
1 1/2 cups crushed Oreos (about 15 cookies broken in a food processor)
3 Tbsp butter, melted
1 pint heavy cream
1 Tbsp powdered sugar
1 tsp vanilla paste
1 package chocolate pudding, prepared as directed
5 pieces candied bacon, chopped
Mix together crushed oreos and butter until all the crumbs are moist. Gently pat into the bottom and sides of a pie dish. Refrigerate until ready to use.
In a mixer, whip heavy cream, powdered sugar, and vanilla until soft peaks form. Don't overwhip the cream. Gently fold half the whipped cream into the pudding and pour into the prepared pie dish. Top with the remaining whipped cream and decorate with the chopped bacon. Chill before serving.
Tuesday, January 31, 2012
Fried Olive Salad Toppers
Like I said, olives are delicious and make me happy. I couldn't choose just one January Kitchen PLAY recipe featuring Lindsay Olives, so I tried a second one for kicks. Because what's not to love about CHEESE-STUFFED FRIED OLIVES?! Dear god, they're wonderful.
I followed Fake Ginger's recipe, subbing in feta for roquefort and adding a small oregano leaf with the cheese. I ate a few of these straight out of the fryer and of course loved them, but they needed something. I grabbed some arugula from the fridge and tossed it lightly with a little lemon vinaigrette (basically just 1 part lemon juice, 2 parts olive oil), then perched a few olives on top. What a perfect match! The bitter greens stood up to the saltiness of the olives, the tender leaves contrasted with the crispiness of the fried bits, and the unctuous of the olive oil and the olives tied everything together. So while these make a very tasty amuse bouche as Fake Ginger intended, I loved them far more as delicious little croutons on my salad.
Cheese-Stuffed Olives
1 can Lindsay black olives, drained and patted dry
2 ounces feta
handful small oregano leaves
1 cup flour
1 egg, beaten
1 cup panko breadcrumbs
about 2 cups canola or vegetable oil, for frying
Stuff each olive with a piece of feta and an oregano leaf. (If the cheese is very crumbly, just stuff in as much as you can.)
Heat oil in a tall-sided pot over medium heat. When the oil is hot, work a few olives at a time: roll in flour, dip in egg, then coat with panko before adding to the hot oil. Cook until golden on one side, then flip and cook until golden. Cool on a paper towel-lined plate. Repeat with the rest of the olives. Salt lightly before serving.
I followed Fake Ginger's recipe, subbing in feta for roquefort and adding a small oregano leaf with the cheese. I ate a few of these straight out of the fryer and of course loved them, but they needed something. I grabbed some arugula from the fridge and tossed it lightly with a little lemon vinaigrette (basically just 1 part lemon juice, 2 parts olive oil), then perched a few olives on top. What a perfect match! The bitter greens stood up to the saltiness of the olives, the tender leaves contrasted with the crispiness of the fried bits, and the unctuous of the olive oil and the olives tied everything together. So while these make a very tasty amuse bouche as Fake Ginger intended, I loved them far more as delicious little croutons on my salad.
Cheese-Stuffed Olives
1 can Lindsay black olives, drained and patted dry
2 ounces feta
handful small oregano leaves
1 cup flour
1 egg, beaten
1 cup panko breadcrumbs
about 2 cups canola or vegetable oil, for frying
Stuff each olive with a piece of feta and an oregano leaf. (If the cheese is very crumbly, just stuff in as much as you can.)
Heat oil in a tall-sided pot over medium heat. When the oil is hot, work a few olives at a time: roll in flour, dip in egg, then coat with panko before adding to the hot oil. Cook until golden on one side, then flip and cook until golden. Cool on a paper towel-lined plate. Repeat with the rest of the olives. Salt lightly before serving.
Sunday, January 29, 2012
Olive and Goat Cheese Pasta Salad
I know what you're thinking - that's not a photo of pasta salad. You're right, because when I started cooking, I wasn't aiming for pasta salad. If you can't have some flexibility in the kitchen, you're in trouble.
While going through January's recipes over at Kitchen PLAY sponsored by Lindsay Olives, I wanted to cook just about all of them. I'm a big olive fan, so they all looked good to me. And since I'm also a fan of anything wrapped in puff pastry, I opted to try the olive and goat cheese turnovers from Chez Us. Don't her photos of the turnovers look amazing?!
And yes, I did make the turnovers. I loved them - pillowy bites of salty olives and tangy goat cheese. I subbed in some red onion for the shallots, because that's what I had. I loved these and the sophistication they would bring to any dinner party. In fact, I might have to bring them to the next family gathering, as I know my family loves cheese wrapped in dough as much as I do.
But I had some filling leftover (I only used one box of puff pastry instead of two), and I wasn't going to let it go to waste. I was going to just spread it on crackers, but I didn't have any. But there was pasta! I boiled up a little bit of whole wheat pasta and tossed it with the cheese mixture and a little bit of the pasta water.
Oh my, what a wonderful pasta sauce this makes! I ate some warm and enjoyed it, but when I ate some cooled, I enjoyed it even more. This would be a perfect picnic dish (I mean, our weather has been so bizarrely warm that us New Englanders could even have a picnic right now), or even great for lunch at work.
Olive and Goat Cheese Pasta Salad inspired by Chez Us
2 Tbsp olive oil
1/2 red onion, minced
1 can Lindsay green olives, drained and minced
1 can Lindsay black olives, drained and minced
zest of 1 lemon
handful of fresh oregano, minced
black pepper
10 ounces goat cheese
1 box small pasta (like rotini)
In a medium pan, heat olive oil over medium heat. Add onion and saute until soft, about 3 minutes. Add olives and cook about 5 minutes, stirring occasionally. Remove from heat and add lemon zest, oregano, and black pepper to taste. Let cool slightly, then stir in goat cheese until well combined.
Cook pasta according to box. Mix the pasta and the cheese mixture until well combined. Add a little of the pasta water if the cheese is too clumpy. Refrigerate before serving.
Labels:
appetizer,
Kitchen Play,
olives,
pasta,
recipe,
vegetarian
Monday, January 16, 2012
Vampire Slayer Dip
I hate yogurt. Like, really hate it. I know that this, along with my dislike of pilaf and paklava, makes me a bad Armenian, but I can't help it. It's just gross.
But sometimes (like after taking antibiotics), yogurt is a must. I can stand the stuff as long as it doesn't taste like yogurt, and usually a strong dose of garlic (like in tzatziki) will do it. I had already made one batch of tzatziki, though, so I needed another way to incorporate garlic and yogurt. How about two heads of garlic and two onions? If that couldn't stop the yogurt flavor, nothing could.
Of course, all that garlic can also stop vampires. So this dip will not only help your stomach feel better, it will also save you from an untimely death due to vampire bites. You can thank me later.
Vampire Slayer Dip
1 large (or 2 small) head of garlic
1 sweet onion
1 yellow onion
olive oil
2 cups Greek yogurt
handful of parsley
juice of 1/2 lemon
salt
pepper
Preheat oven to 400°. Remove loose papery layers from garlic head and cut off the top 1/4 inch. Place garlic in the middle of a sheet of tin foil. Top with a little bit of olive oil, wrap tightly in foil, and bake for 30-45 minutes (until cloves are soft). Let cool, then squeeze garlic cloves out of their papery shells.
Slice onions very thin. Heat a tablespoon or so of olive oil in a large pan over medium heat, then add onions. Cook about 30 minutes, stirring frequently, until onions are a deep amber color. Onions may need a little more olive oil as they cook. Cool before using.
Add cooled garlic and onions to a medium bowl, reserving about 1/4 of the onions for later. Add yogurt, then blend (either in a blender or with an immersion blender) until smooth. Add remaining onions and a handful of parsley leaves and blend lightly so there are still pieces visible. Add lemon juice, salt, and pepper to taste, and stir to combine. Make sure everyone eats at least a little bit so you don't knock anyone out with your breath.
Wednesday, January 4, 2012
Caramel Nut Bars
Have you ever looked at a recipe and known - just KNOWN - that you'd love it? I like to think that I feel that way often, but in reality, after executing the recipe (maybe not to the T, but pretty damn close), I'm disappointed. I was prepared for that to be the way with the Butterscotch Blondie Bars with Peanut-Pretzel Caramel (they really couldn't have come up with a shorter name?) in the December 2011 Bon Appetit. I added them to my list of holiday baking, making sure I had plenty of cookies that were guaranteed to be tasty, and I set to baking.
And holy CRAP, these things are good! They're a nice mix of sweet and salty (but not too salty), crunchy and chewy, love and more love. I changed the recipe a little bit (by adding almonds), and I would change it further to include more pretzels (I have done so in the recipe below). 2011 apparently was the year I became confident making caramel, and this was the perfect way to end the year on that account.
As far as serving goes, I ended cutting these up into tiny pieces because it's so rich. I originally cut 36 or 40 bars from the 13x9 pan, and I doubt I could have eaten one in a go. Cutting them up even further made them last throughout the holiday, as well.
Caramel Nut Bars (adapted from Bon Appetit)
Blondie bar
1 1/2 cups flour
2 tsp baking powder
1 tsp kosher salt
1 1/2 sticks (3/4 cup) unsalted butter
2 cups packed brown sugar
2 eggs
1 tsp vanilla extract
Preheat oven to 350°. Line a 13x9 baking pan with parchment paper, leaving an overhang so you can pull the bars out easily later. Whisk together flour, baking powder, and salt and set aside.
Heat butter in a medium pan over medium heat, stirring until browned bits form at the bottom of the pan, about 7-8 minutes. Transfer to a large bowl (or bowl of a stand mixer). Add brown sugar and beat until combined and the mixture looks like wet sand. Add eggs and vanilla and beat until fluffy. Add dry ingredients and beat until smooth. Spread batter evenly in the prepared pan - it will puff as it bakes, so don't worry if you think you're spreading it too thin.
Bake 20-25 minutes, until golden brown and edges pull away from the sides of the pan. Cool completely before moving on to the topping.
Caramel Nut Topping
2 cups sugar
1/2 cup water
1/4 cup honey
1/2 stick (1/4 cup) unsalted butter
1/2 cup heavy cream
4 cups roasted peanuts (or a mix of peanuts and almonds)
2 cups salted pretzels, coarsely crushed
In a large saucepan, stir together sugar and water over medium-low heat until sugar dissolves. Increase the heat and boil without stirring (seriously, hands off!) until caramel is a deep amber (or caramel, if you will). This always takes longer than I think it should, but I'd rather it take a long time than burn the caramel right off the bat. Add honey and return to a boil, stirring, for about a minute. Add butter and stir until melted. Add cream and whisk until smooth (maybe wear a pot holder because this will steam and bubble A LOT). Add nuts and pretzels and mix until everything is covered in caramel. Pour over cookie and press down evenly. Chill until cool, then remove from pan and cut into bite-size pieces. Store in the fridge but bring to room temperature before serving.
Wednesday, December 21, 2011
The King's Toddy, or My New Health Tonic
I have never been one to sip a little something when I'm not feeling well. I always thought it was an old wives' tale that having a dram of whiskey or something could cure your ills. I'm beyond thinking that now.
A few months ago, I was invited to the Boston launch of No. 3 Gin and The King's Ginger (a ginger liqueur) at Eastern Standard. I, of course, tried all the iterations of gin cocktails that were offered to me, but my favorite of the night was a simple hot toddy made with both No. 3 and King's Ginger. The King's Ginger especially was intriguing to me because it has a much better, richer, fuller ginger taste than the other ginger liqueur on the market. I couldn't wait to get a bottle for myself. Or I thought I couldn't. Instead, I forgot all about it.
Last week, though, after feeling sick for most of this month, I was reminded of the cocktails I had tried at the event, and I remembered just how much I had loved that hot toddy. I searched around for No. 3 and King's Ginger (eventually finding them at Downtown Wine and Spirits in Somerville) and got to work.
I've made these toddies a few times now, and it only takes a sip or two to feel its effects. Between stress at work (Christmas retail in a store with concrete floors is HELL) and whatever illness I have that won't go away, I'm definitely more tense than I should be, but a King's Toddy soothes like nothing else. The warmth coupled with the intoxicating ginger, the subtleties of the gin paired with lemon and honey all add up to love in a mug.
The King's Toddy
1 oz No. 3 Gin
3/4 oz fresh lemon juice
1/2 oz King's Ginger
tsp honey
In a mug, combine gin, lemon juice, ginger liqueur, and honey. Top with hot water and whisk to dissolve the honey. Garnish with lemon twist.
A few months ago, I was invited to the Boston launch of No. 3 Gin and The King's Ginger (a ginger liqueur) at Eastern Standard. I, of course, tried all the iterations of gin cocktails that were offered to me, but my favorite of the night was a simple hot toddy made with both No. 3 and King's Ginger. The King's Ginger especially was intriguing to me because it has a much better, richer, fuller ginger taste than the other ginger liqueur on the market. I couldn't wait to get a bottle for myself. Or I thought I couldn't. Instead, I forgot all about it.
Last week, though, after feeling sick for most of this month, I was reminded of the cocktails I had tried at the event, and I remembered just how much I had loved that hot toddy. I searched around for No. 3 and King's Ginger (eventually finding them at Downtown Wine and Spirits in Somerville) and got to work.
I've made these toddies a few times now, and it only takes a sip or two to feel its effects. Between stress at work (Christmas retail in a store with concrete floors is HELL) and whatever illness I have that won't go away, I'm definitely more tense than I should be, but a King's Toddy soothes like nothing else. The warmth coupled with the intoxicating ginger, the subtleties of the gin paired with lemon and honey all add up to love in a mug.
The King's Toddy
1 oz No. 3 Gin
3/4 oz fresh lemon juice
1/2 oz King's Ginger
tsp honey
In a mug, combine gin, lemon juice, ginger liqueur, and honey. Top with hot water and whisk to dissolve the honey. Garnish with lemon twist.
Subscribe to:
Posts (Atom)